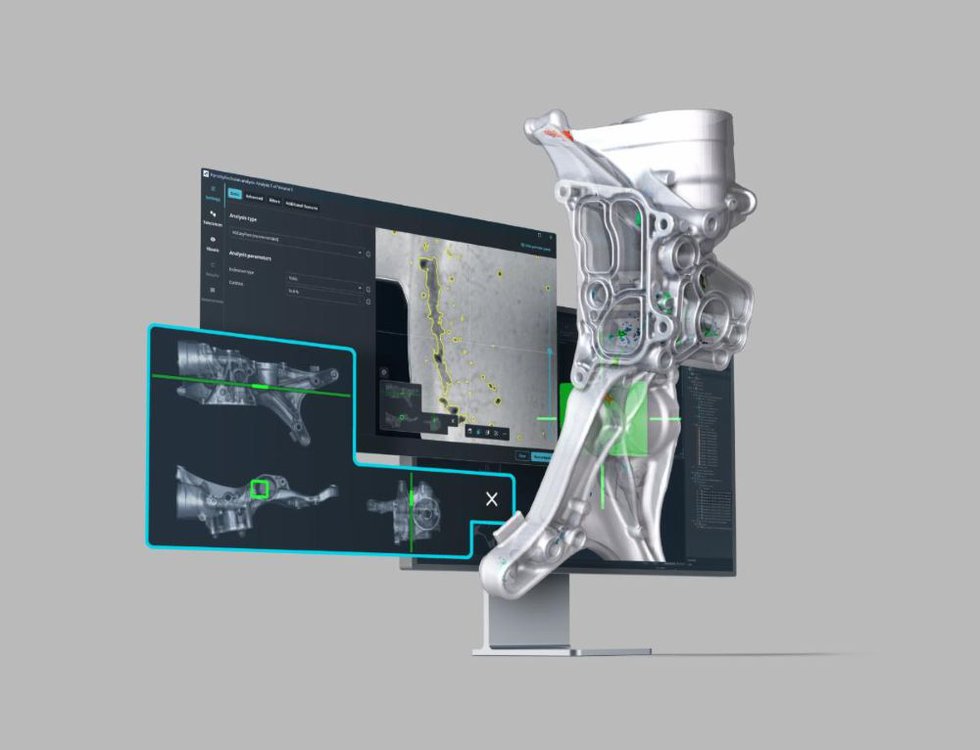
Hexagon has launched the latest version of its VG software. The 2025.3 edition features an improved version of its Porosity & Inclusion analysis (PIA) tool, which won an iF Award earlier this year. Automotive, aerospace, and other manufacturers utilise CT-scan data analysis for quality assurance purposes. PIA now leverages AI, which helps quickly pinpoint and identify discrepancies, such as pores and inclusions, deep within metal, plastic, or composite parts, components, or material samples. This identification process may occur at any point during the manufacturing cycle.
“This is the first time our tool combines all previous methods into a single, powerful solution, from analysis to reporting,” said Jan Gräser, Product Manager VG Product Line, Manufacturing Intelligence Division. “We’ve completely redesigned the user interface for this feature to make it easier for everyone, from beginners to experts, to employ the PIA to understand their results and conduct even the most complex analyses easily, accurately, and efficiently.”
Key features in the Porosity & Inclusion Analysis tool:
- Intuitive design: The important settings are immediately visible and briefly summarised, with advanced options accessible on separate tabs.
- Enhanced workflow: Fewer clicks, more overview, maximum control. Now, all porosity/inclusion analysis procedures are available in a single solution, allowing for direct access to the core functions. This eliminates the need to switch between different dialogues.
- Simplified navigation: The new preview in the analysis dialogue combines all key information, making navigation easier with an interactive mini map that shows the user’s current position in the analysis window.
Other features in Hexagon’s 2025.3 VG software release:
- Multipart coordinate measurement simplifies the handling of complex projects, allowing users to view, analyse, and edit measurement plans for multiple parts in one location. Enhancements include essential statistics for features directly in the feature list, interactive plotting of different values across all parts for individual features, and functions for directly editing, removing, and transferring features and geometry elements across all parts.
- Create and modify dimensions directly in the 3D view. With the “Dimensioning” dialogue open, users can create and adjust dimensioning features by dragging and dropping the measurement lines directly in the 3D view. Also, by holding down the “Alt” key, users can create projected dimensions on a preview plane.
- Enhanced deformation field capabilities for optical scans. Designed for complex morphing of incomplete optical scans, which can often be challenging in deformation field computation, including issues like missing parts due to scanner limitations and the need for precise matching. This improvement allows for more accurate and comprehensive handling of complex optically scanned parts.
- Improved mesh import/export now supports GLB/GLTF, AMF, and 3MF file formats, making it easier to exchange 3D surface data with other applications.
“Our goal with the redesigned Porosity & Inclusion Analysis feature, as well as others in version 2025.3, is to streamline the way our users work with our software, helping them make decisions about design and manufacturing parameters faster and more efficiently,” said Dr Daniela Handl, General Manager VG, Manufacturing Intelligence Division. “These robust capabilities will improve workflows and elevate the non-destructive evaluation process for a wide variety of manufacturers who employ 3D CT scanning for quality assurance.”


